How to Screen Record on Windows 11?
Looking to capture everything on your screen in Windows 11? Don’t worry, the latest version of Windows made everything more accessible, simple, and fancy.
Taking a snap on PCs running Windows is pretty easy because it is just a combination of two keys i.e Win + prt sc. But, video capturing screen on nearly every Windows app either on the desktop or laptop is a bit difficult and there are no shortcuts keys, or tricks until Windows 8.
Thanks to the Microsoft team for bringing a built-in screen recorder feature to Windows 11 with an Xbox game bar – a one-stop solution for endless possibilities.
You can use this feature to capture gameplay, take screenshots, adjust audio, and also record calls. It is free, comes pre-installed, and easy to use.
Here’s my experience with the built-in screen recorder in Windows 11
I tried this feature in Windows 11 to video capture gameplay for one of my YouTube channels. Everything went well and the video file of size 765 MB was automatically saved in MP4 format on C:\Videos. I felt very happy and immediately uninstalled the third-party screen recorder apps installed previously.
On the next day, I tried to record the zip file extracting process in Windows File Explorer. But, I’m unable to do it and the Start recording button got disabled. I tried again and again, but nothing works fine even after clearing the cache and updating the app. I was very frustrated and started surfing the web.
And after reading multiple pages, I noticed that the built-in screen recorder feature introduced secretly in Windows 11 has a few downsides. They are:
First off, you cannot record your desktop screen, File Explorer, etc.
Secondly, you can’t jump between Windows.
If these things don’t affect you, this screen recorder is probably good to capture the real-time screen. In case it doesn’t work for you, relax and move on. Because I also introduced an alternative to video capture the screen.
Let’s take a look at the pre-installed ones first.
How to Screen Record in Windows 11 with/without Audio
Video capturing screen on Windows 11 is very easy. However, if you want to do it without installing any third-party screen recorders on your latest Windows 11, the following are the best ways to video capture anything visible on the desktop.
No matter what is opened, whether it is a game, app, or software, based on your requirements, pick the one that best suits at the moment and get the video file in high resolution with/without audio.
With Xbox Game Bar
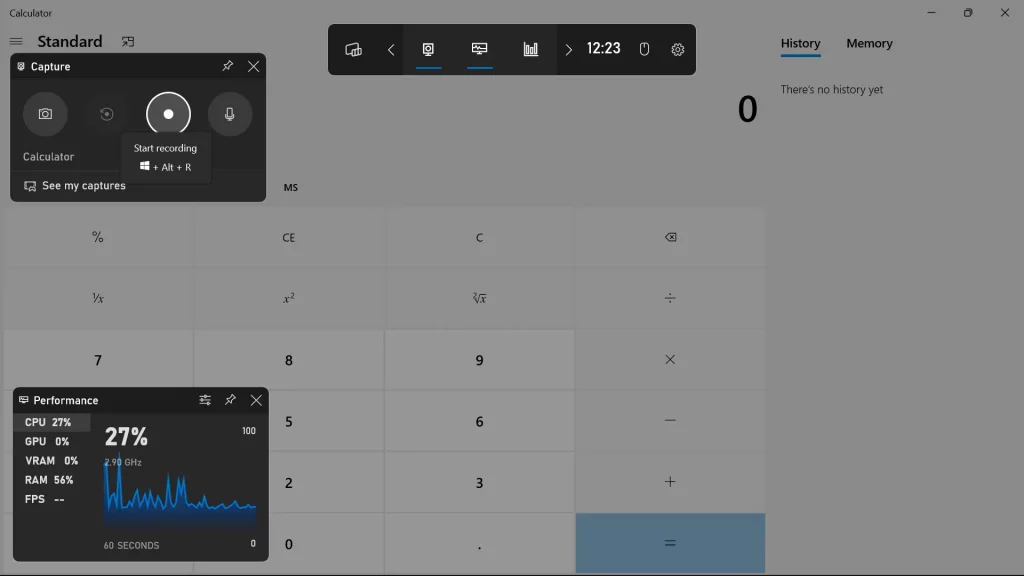
To video capture your screen in Windows 11 using Xbox Game Bar, here are the steps you’ve to follow to access the native screen recorder in Xbox Game Bar.
1. First, fire up the app/game you wish to record screen.
2. Once the source is ready, press the keys Win + G at the same time to open the Xbox Game Bar.

3. Now, hit the Start recording button (or Win + Alt + R) in the Capture menu on the top left to start capturing the screen.
4. A small recording widget showing how long you’ve been recording appears at the corner.
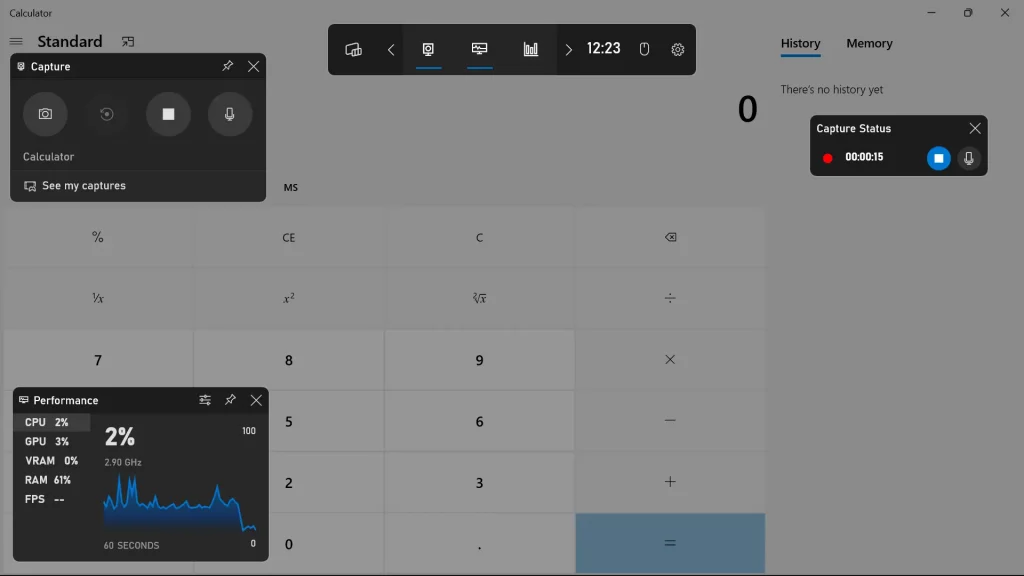
5. When you’re about to quit, click on the stop icon in the widget or hit Win + Alt + R.
You’re done. Head over to Windows File Explorer app and visit Videos > Captures to find the recording.
With Microsoft PowerPoint
The best ever option for PCs running Windows OS. No matter the version, if you’d like to screen record something on your PC with/without audio, stop looking for how to screen record on PC and focus on the step-by-step guide demonstrated below.
Microsoft office with built-in tools Word, Excel, and PowerPoint comes default in Windows. If you have it on your PC, dive right in to know how to use the built-in screen recorder in Microsoft PowerPoint.
1. Open the PowerPoint app and begin with a Blank Presentation.
2. Once it is loaded, click on the Record tab and select Screen Recording.
3. In the control dock that appears, choose Select area and draw directly over the area you want to record.
4. Once the selection is made, click the Record button to start capturing the selected area.
5. When you’re done, hit the Stop button or Win + Shift + Q.
PowerPoint will automatically insert the recording into the slideshow. To save it somewhere, right-click on the video and choose Save Media as…
Lastly, choose a Folder > give it a name, and then hit Save.
Note: To turn off the audio and the appearance of the mouse pointer, use the buttons in the dock to switch them off.
By default, both these built-in Screen Recorders in Xbox Game bar and Microsoft PowerPoint save the recorded video in MP4 format.
FAQs
1. Where do screen recordings go Windows 11?
By default, all the screen recordings will be saved under the Videos folder in a subfolder labeled Captures in MP4 format.
2. Does Windows 11 have a screen recorder?
Yes, to screen record on your Windows 11, press the keys Win + G at the same time and click on Start recording in the Capture menu that appears at the top left. To stop, use the widget in the top right corner.
3. How do I record my screen on Windows 11 for free?
Windows 11 has a built-in screen recorder in the Xbox Game Bar. It is free to use. You can follow our guide on how to screen record in Windows 11 with Xbox Game Bar and get your recording in MP4 format.
Wrap Up
This is how Windows 11 made screen recording easier with the Xbox Game Bar. For games, it is one of the best screen recorders ever made. However, if you want to capture something out of the track, Microsoft PowerPoint is the best alternative to the one side loaded in the Xbox Game Bar.
So, based on your work, go for the one you wish without wasting time looking for third-party screen recorders.


1 Response
[…] Suggested Read: How to Screen Record on Windows 11 […]