How to Clear Cache on Android to Boost Speed and Free Up Storage Space
Have you ever questioned why Android devices run out of space upon usage over time? It’s because of the cache generated.
Every activity you perform on your device generates some temporary files to quickly recall associated information when you perform the same actions over and over again. It is necessary but useless, sometimes. To get to know whether you should keep it or clear it, let’s take a quick look to know everything about cache and how to clear cache on Android to make it run faster.
Contents
- What Is Cached Data?
- Is Cached Data Important?
- Where Is Cache Stored on Android?
- How to Clear Cache on Android Devices?
- How to Clear Cache on Android Automatically?
- How to Clear Overall Android Device Cache at Once?
- How to Clear Cache in Mobile Browsers?
- What Happens After Clearing Cache on Android?
- Should I Clear Cache or Keep It?
- Benefits of Clearing Cache on Android
- How Often Should you Clear your Cache?
- Difference Between Clear Cache and Clear Data on Android
- Last Words
What Is Cached Data?
Cache is nothing but pieces of information/temporary data files generated by apps, games, and browsers to trigger start when you re-launch them again and again. It is a continuous process and the temporary information created for every activity you perform may contain files, media, thumbnails, backend script codes, etc.
Sometimes it may or may not have useful data. But, to reduce the app loading time and to speed up the browser/app usage, cache plays a key role to trigger the opened web pages along with the data you provided such as a password, username, etc., without the need for reloading the app/page every time until it is active in the background.
For detailed information, just keep scrolling.
Is Cached Data Important?
Cache will generate for every app, game, and browser on your Android. But, all those pieces of information created have both useful (if provided) and useless stuff that eats up your device storage and slows down the performance.
The flip side is that it will occupy the majority of the valuable space on your Android only to offer you a smooth experience and to speed up the browsing by making everything readily available at the launch. So that you land on the pages where you left off without waiting for the page to download from the internet again.
Therefore, the cache is inherently important as it plays a key role in saving on-time information and helps access it in the near future.
Where Is Cache Stored on Android?
The pieces of information generated by apps and browsers are stored temporarily in an accessible storage media (a small chunk of memory on the processor) which is local to the cache client and separate from the main storage. Because cache decreases data access times, reduces latency, and improves input/output (I/O) which becomes a burden for main storage to meet the demands of users. That’s why the cache is stored on a chunk of memory on the processor for fast retrieval.
How to Clear Cache on Android Devices?
As stated above, the cache is just junk created to fasten the performance and to keep the loaded information. Clearing it frees up storage space but restarts/reloads everything such as images, text, thumbnails, etc., from the very beginning.
However, if you’re on your way to clear cache on your Android, simply follow these instructions to clear cache on your Android.
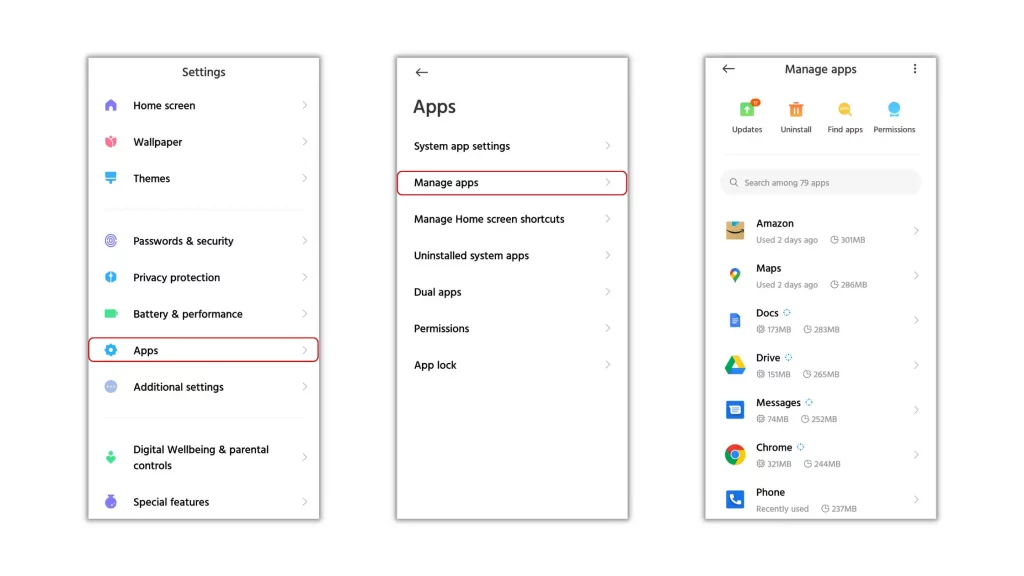
Step 1: Find the apps you’re about to clear cache
To do it, head to device settings and select Apps > Manage apps to see which of your apps are eating more storage space.
Step 2: Filter the list
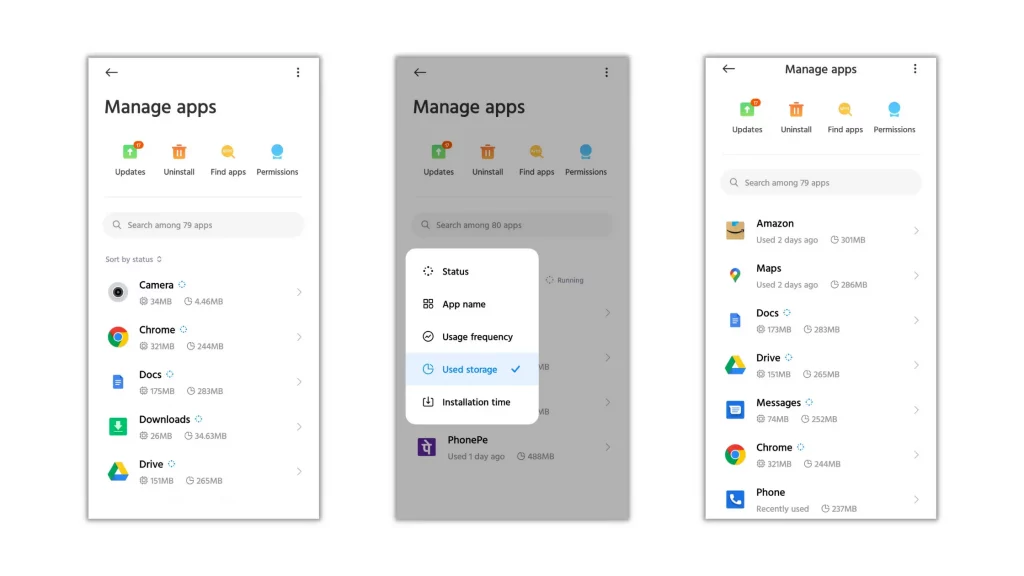
From the list of applications installed on your Android, filter the list to figure out apps with more cache by arranging them in descending order.
To do it, use the Sort by menu and choose the option Used storage to bring apps with more cache to the top.
Step 3: Find the cached data
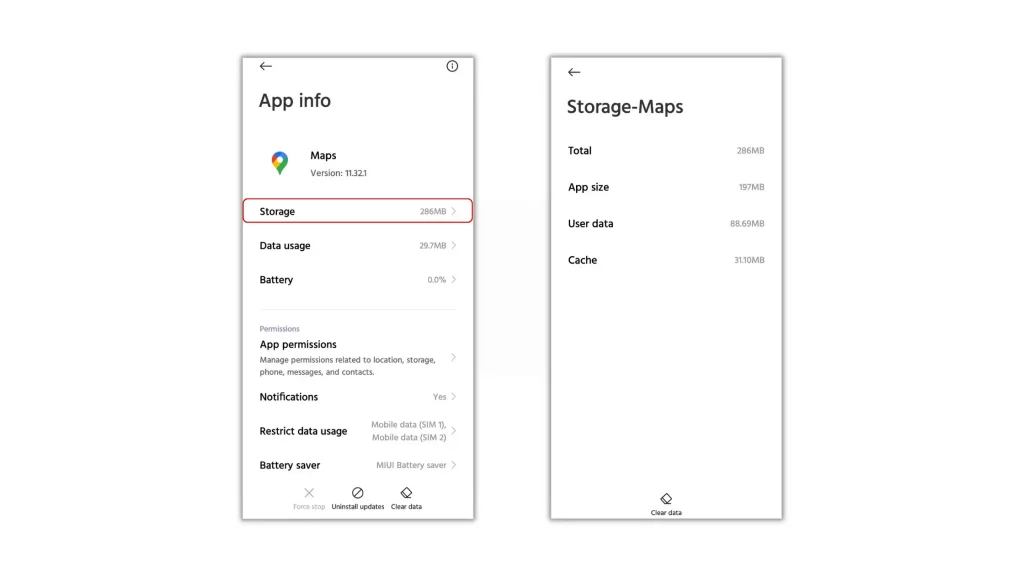
The data used by the app you see on the Manage apps Settings page is the total storage space captured by it on your device. It contains download size, login information, and other useful stuff. If you clear the total data, the app may misbehave and destroy everything stored.
Therefore, to stay away from such risks, first, select the app you want to clear cache and choose the option ‘Storage’ on the App info page to get everything in detail such as App size, User Data, and Cache.
Step 4: Make sure to clear the cache
Before going to clear cache, make sure that the application you’ve selected doesn’t have the cache of more than 25 MB/50 MB/100 MB. Because, even if you clear cache, depending on your usage, the same amount of cache will generate again.
So, go for the apps with higher values that you use heavily or regularly.
Step 5: Clear Cache
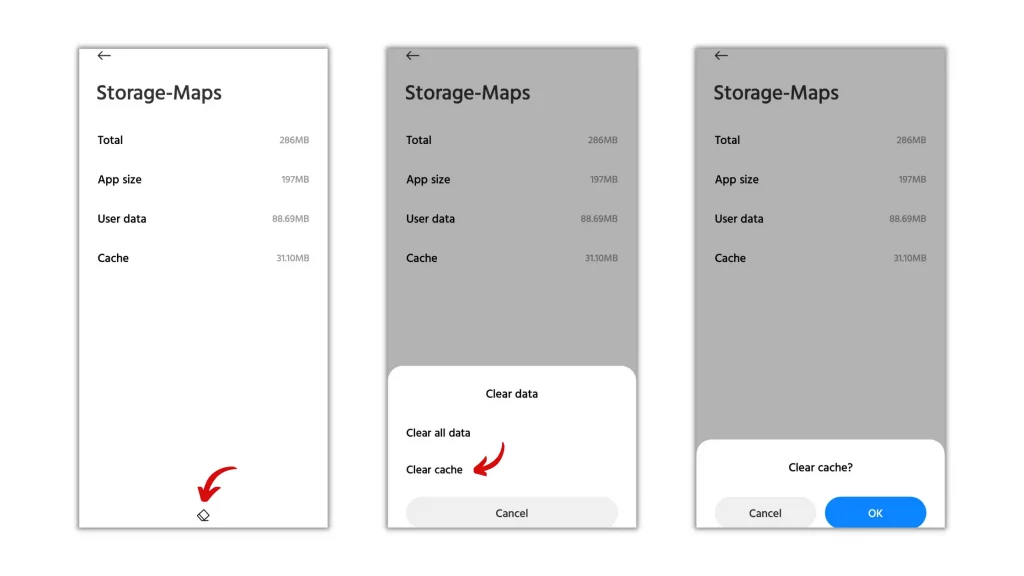
It’s time to free up the space. Now, you’ve all the apps with more cache at the top. For clearing cache, choose the Clear data option assigned with an icon down to the screen.
Finally, select the option Clear cache and hit OK to let the app release cache generated.
Likewise, do this for all the applications with more cache to make your Android run faster and smoother.
Note – If you’d like to clear all cache at once, launch the cleaner app that came by default on your Android to finish the job with a single tap. To know about it, keep on reading.
How to Clear Cache on Android Automatically?
Automating the cache clearing process on Android isn’t a good idea to go with because cache files help in many ways from the inside. Of course, a periodic clean is necessary to free up storage space and improve performance. But, if you’re looking for a way to brush up your Android regularly by automating the process, follow the instructions as detailed.
Most of the manufacturers don’t offer a setting to automate cache clearing either from the device Settings or the security app they provide. Therefore, to automate the process of cache clearing, installing third-party apps either officially from the Play Store or unofficially out from the platform is the only available option. So, if you’d like to automate the process, do as follows to let the app do your job.
Automating Cache Clearing Using Avast Cleanup
To flush out the unwanted cache and junk files stored, Avast Cleanup is one of the best cleaning tools to vanish both visible and invisible files eating up the device storage. The app is user-friendly and works effectively in clearing leftover files, junk, cache, and long-forgotten folders buried deep in your storage, and many more. To know how to automate the process of cache clearing in the Avast Cleanup app, check the steps below.
Step 1: Install the Avast Cleaner app
Avast Cleanup is the perfect tool to automate cache clearing. To get the app, redirect to the Play Store from here and install the app.
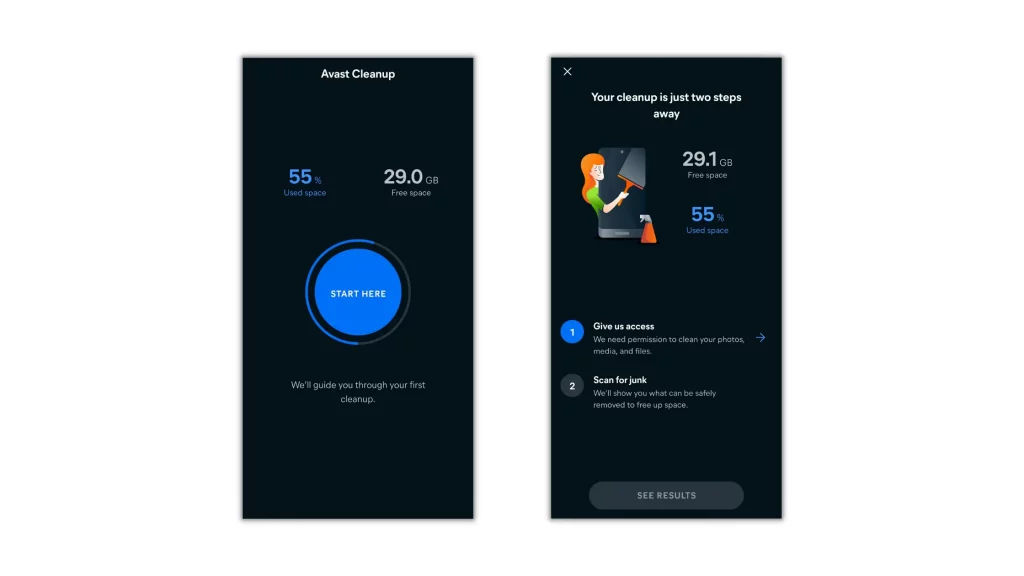
Step 2: Finish the first scan
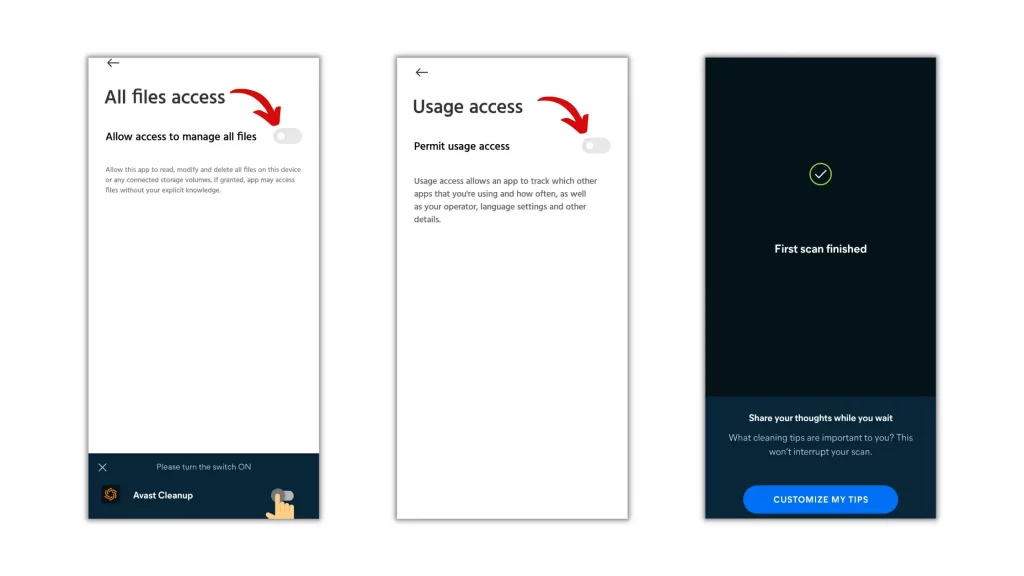
After successful installation, open the app and finish the setup by giving All files access permission and Usage access permission. When done, follow the guide and finish the first scan.
Step 3: Select items to automate
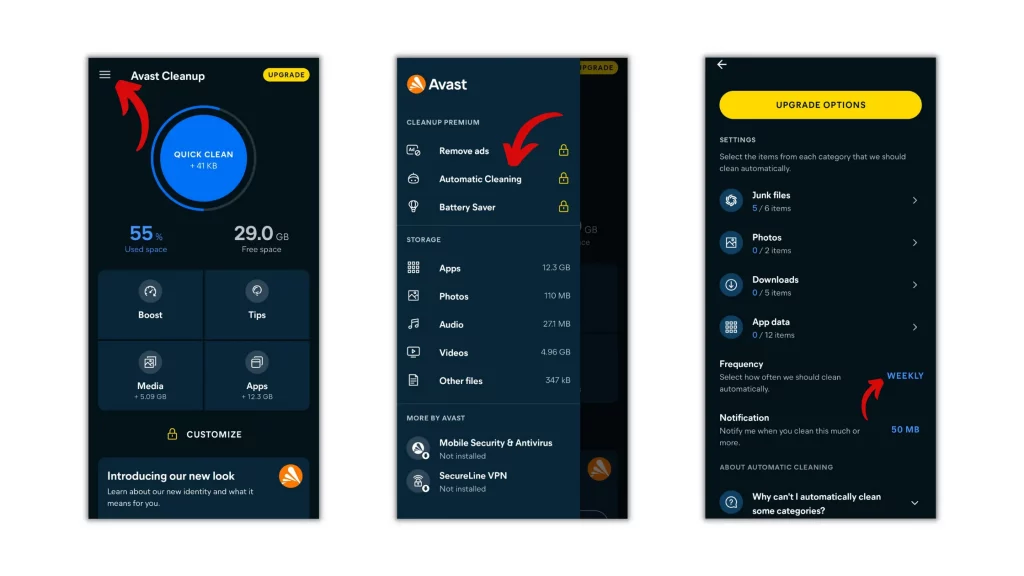
To automate cache clearing, move over to Menu and select the option Automatic Cleaning. Under Settings, check what has to be clean automatically as per your interests from the available categories.
Step 4: Schedule the cleanup
After checking the items, set Frequency to a particular time period and fallback to the home screen. If required, you can also turn on the notification to get notified when some amount of junk is cleaned.
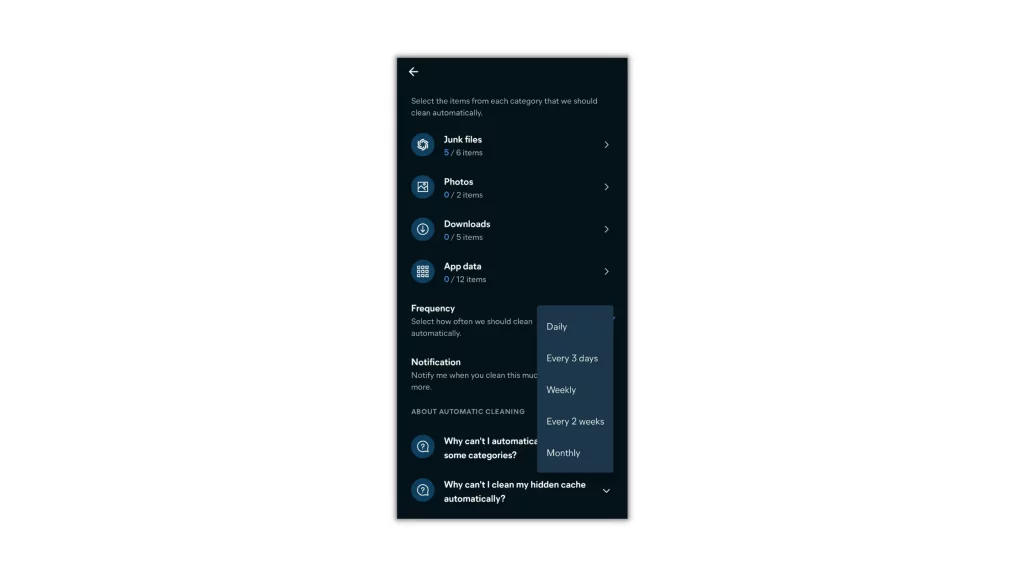
You’re all set. When the time arrives, Avast Cleanup gets activated to clear all the junk from the background and displays the results.
Note – To automate cache clearing with Avast Cleaner, you’ve to upgrade to their premium plan either monthly or yearly.
How to Clear Overall Android Device Cache at Once?
Every app, game, and browser installed on your device stores cache. To clear it, you’ve to visit each and every app Settings page individually and clear cache manually. This is a known process but now it is buried since most people are using separate apps to make the process of cleaning very smarter and easier.
Wait, what if I say that one of the smarter apps most people are using to clear the overall cache is already included in your device? Do you accept the statement? I think you understand what I’m talking about. The cleaner app that came by default on your handset model. Yes, it is the tool that clears the overall cache at once. Shocked? Let’s see how to do it.
1. Open Security or Cleaner app that came by default on your handset model.
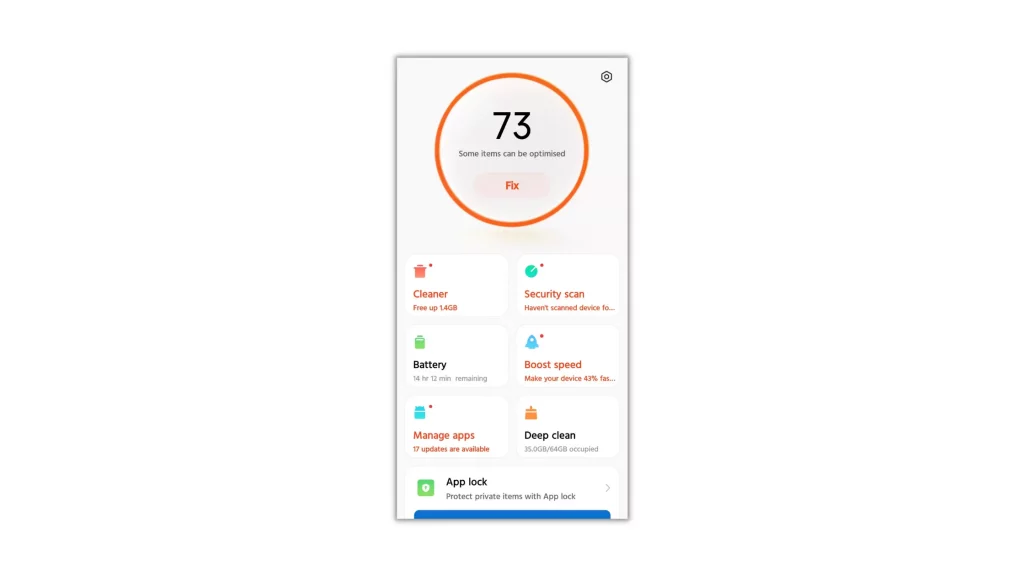
2. Select Cleaner and give it some time to find the overall cache stored on your device.
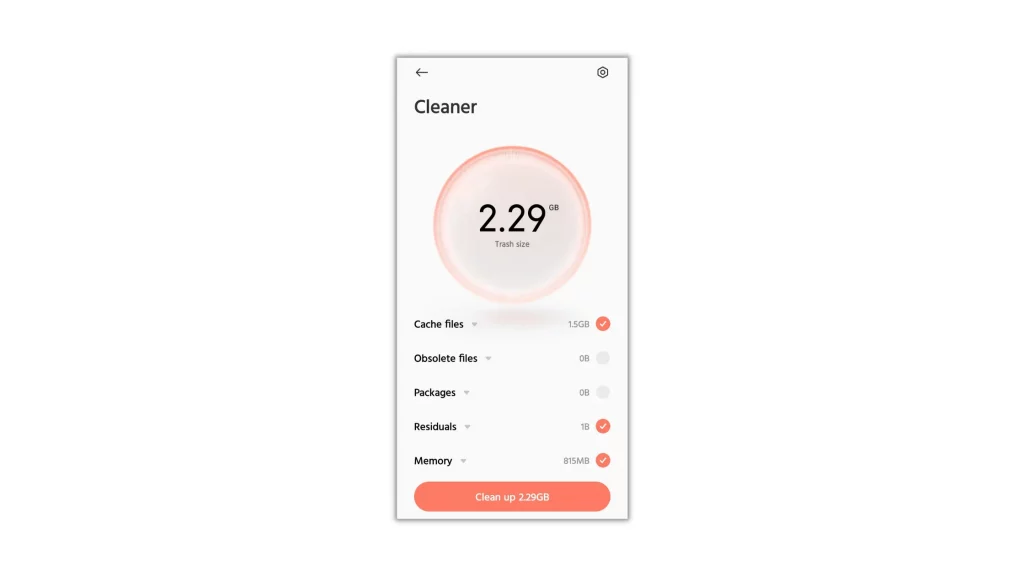
3. After the total value is freeze, use the drop-down menu and see the cache of every app.
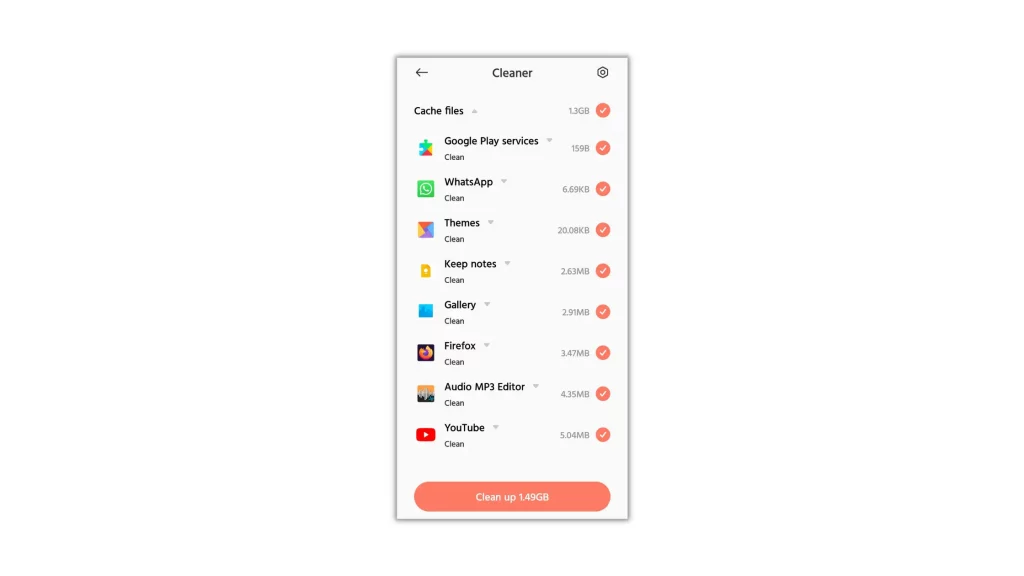
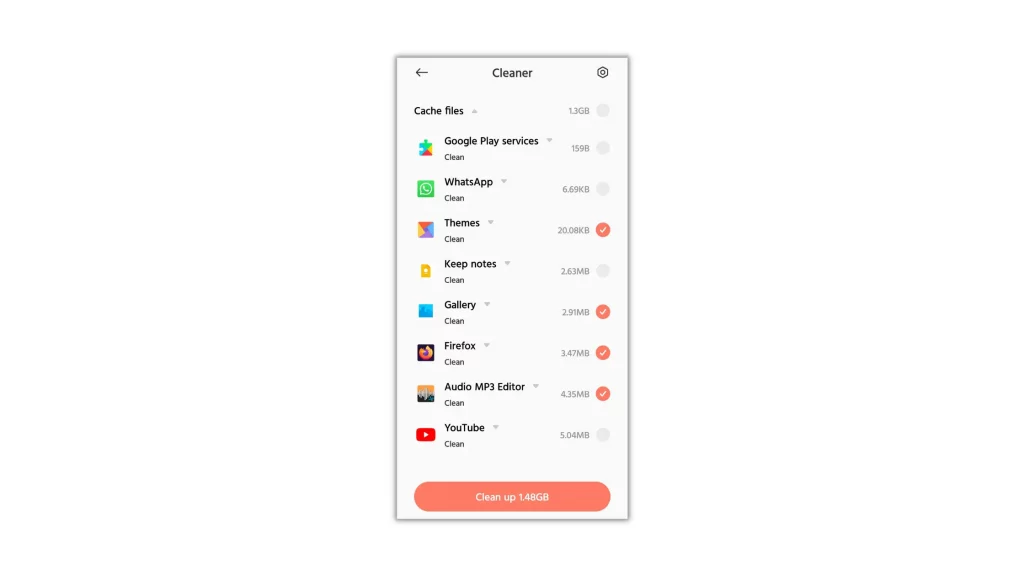
4. If you’d like to proceed, hide the list and hit Cleanup. In case you want to terminate any apps, just uncheck them and finish the process.
How to Clear Cache in Mobile Browsers?
How to Clear Cache in Google Chrome Mobile
From the above steps you’ve got an idea of how to clear cache on Android to make it run faster. This time, you’re going to give your browser a boost from the inside by clearing the cached data stored. So, if you set Google Chrome as your default browser, do as follows to clear cache in Google Chrome to improve your browser performance.
1. Open the Chrome app on your Android and tap on the ellipsis/three-dot menu button in the top right corner to view the drop-down menu.
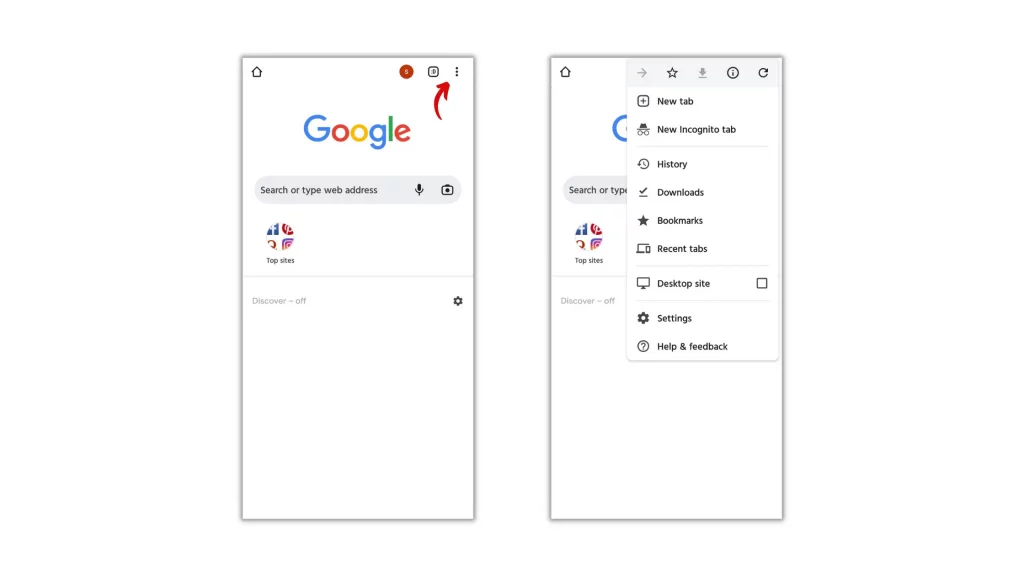
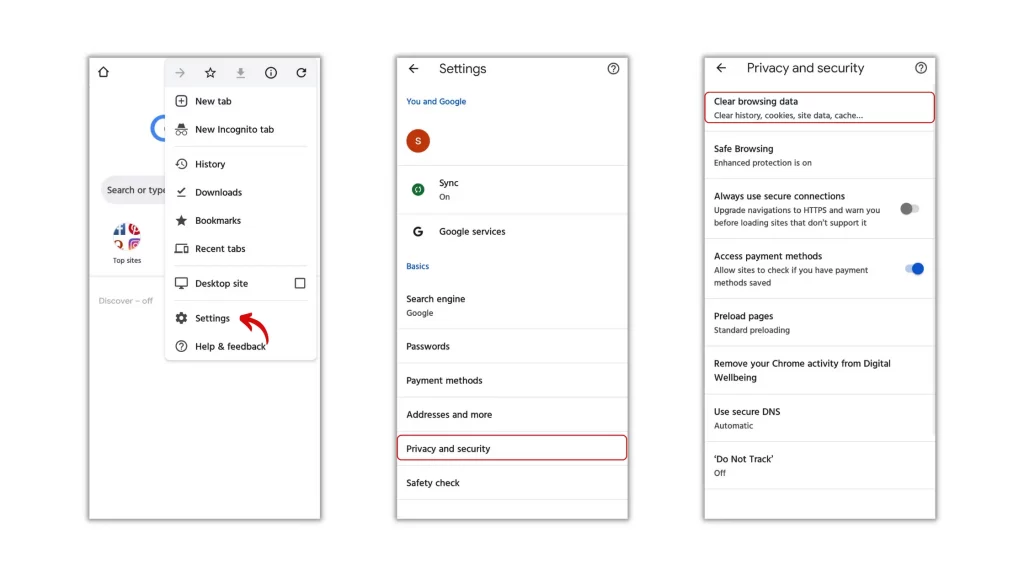
2. From the drop-down menu, move to Settings > Privacy and security > Clear browsing data.
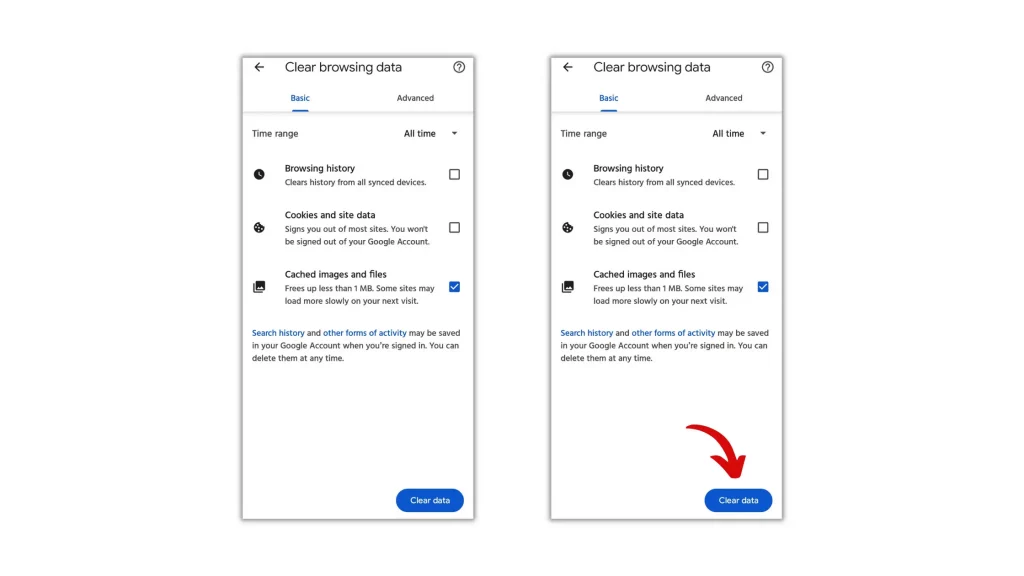
3. There you’ll see two tabs on the dialog: Basic and Advanced. Stay on any tab and check Cached images and files.
Lastly, hit the button Clear data to clear cache in Google Chrome for making it load faster and perform better.
How to Clear Cache in Mozilla Firefox Mobile
Firefox is the most secure web browser after Duck Duck Go. If you’re a user of it, do as follows to make it run faster and perform better if it is your default web browser.
1. Launch the app and head over to Menu.
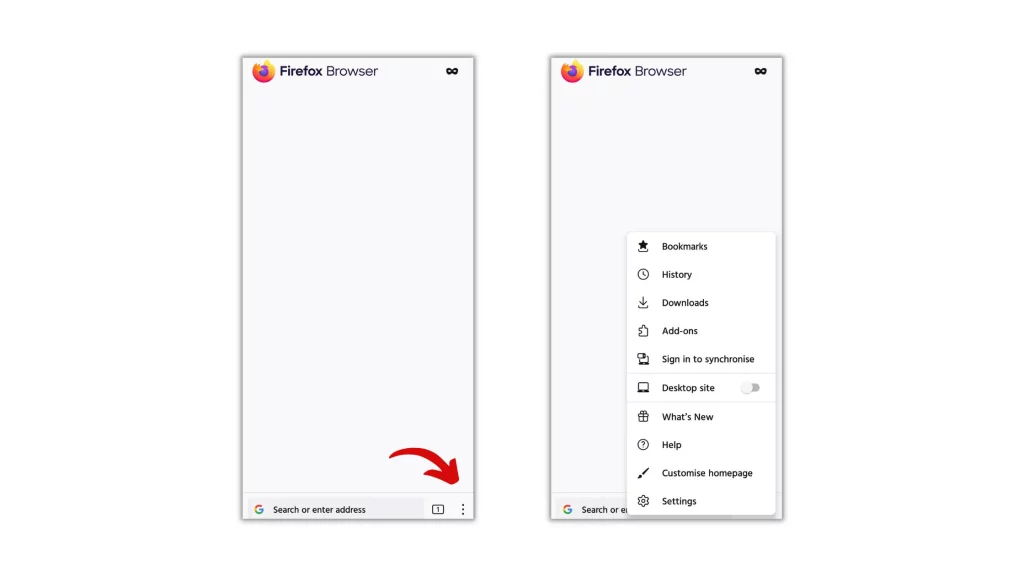
2. Select Settings and reach the Privacy and security panel.
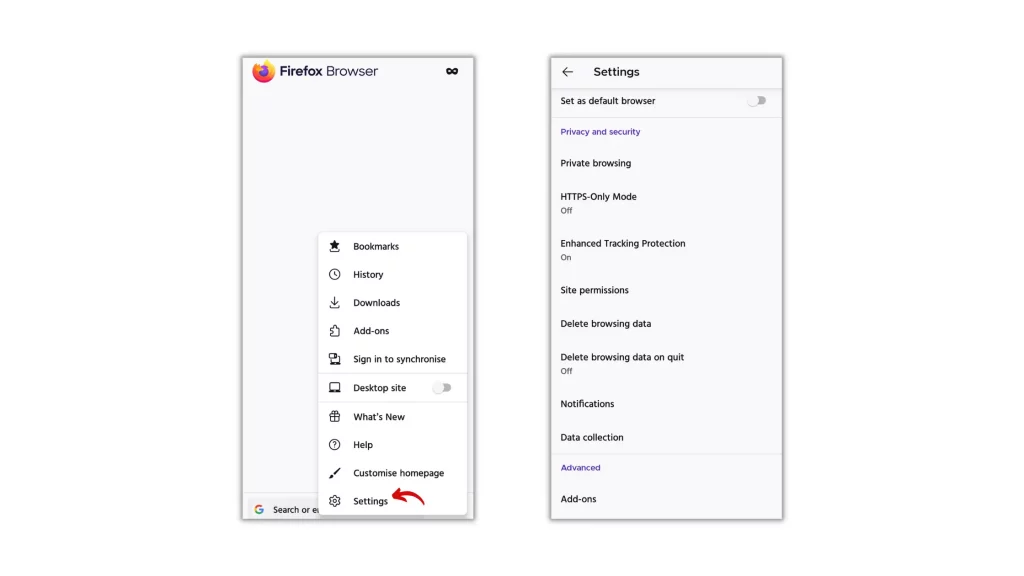
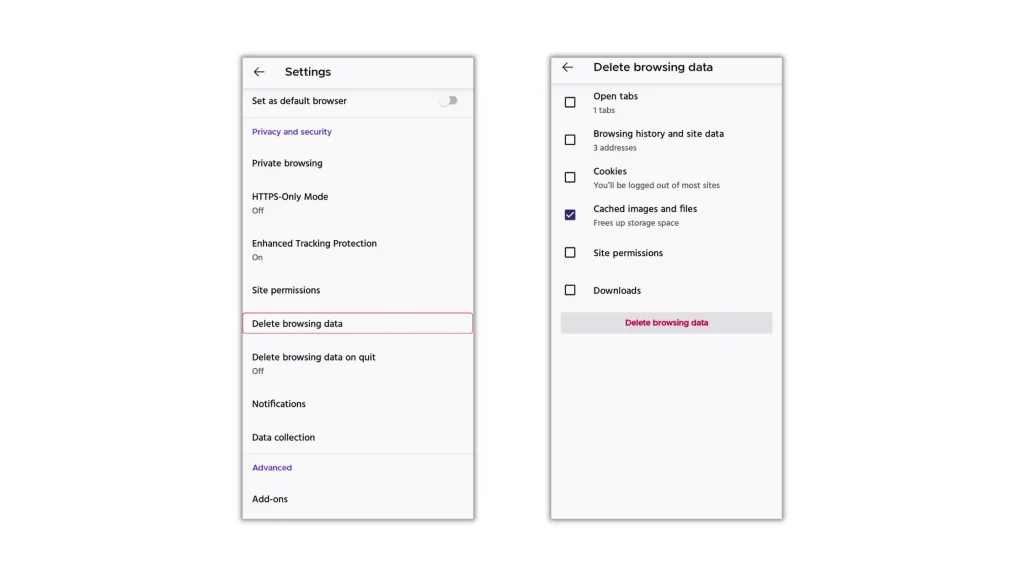
3. Now, choose the option Delete browsing data and check Cached images and files.
Finally, hit the button Delete browsing data to free up storage space.
What Happens After Clearing Cache on Android?
Cache on Android helps in many ways to improve the user experience. It is necessary but useless, sometimes. However, if you’re about to clear it, here’s what happens if you clear cache on Android.
After clearing cached data for every app, game, and browser, your device will regain some amount of space and start performing a little bit faster. But this sudden change in performance won’t stay for a longer period since the cache will start re-generating from the next moment you start using the apps.
This is quite normal since the process is cyclic. Over time, apps will build up cache again and start occupying the storage space.
Clearing cache won’t destroy any data such as login information, media downloaded, browser history/bookmarks, files, and others but you’ve to perform some actions like signing in again, reloading sites, changing settings, etc.
So, if you clear cache, all the unwanted junk created by apps will only be removed from the device to free up storage space and make it run faster. The rest of the useful information stays within the device and reloads when you come back.
Should I Clear Cache or Keep It?
Cache is not completely useless junk to clear every day. It is just temporary data created by apps to save the loaded information downloaded from the internet. Keeping it or clearing it depends on your usage and interest since clearing cache won’t majorly change anything except releasing some storage space.
Cache clearing is only beneficial when you find any performance issues. But, if you constantly perform the action, everything will be reloaded again and again from the internet.
For example, if you launch an online music player, it takes at least 2 or 5 seconds to load the playlists. But, if it has cached data, the app doesn’t take such time to load the playlists again.
This also consumes more data and time which is quite frustrating.
So, according to your usage and storage left on your Android, take the right decision and decide yourself whether to keep cache or clear it.
Benefits of Clearing Cache on Android
Clearing cache is not a bad idea to apply because most of the cache generated is useless. But, for browsers, social media apps, and other similar apps, cache files store login information, webpages loaded, and others to fasten the performance and to provide a smooth experience without letting you sign in every time.
Cache clearing is just a temporary fix to kick-start the speed. If you mess with it, you’ve to start using some apps from the very beginning. So, if you’re on your way to clear cache, check out these benefits once and proceed.
- Cache clearing can free up storage space and improve the performance
- Old cache files stored on your device may pose a security and privacy threat. Cache clearing helps remove that old junk and refresh the memory
- When an application refuses to fetch the latest version, clearing cache can force it to update
- When your device is running on low space, cache clearing helps regain some space
- When apps are misbehaving, cache clearing solves the glitch
How Often Should you Clear your Cache?
No apps, games, and browsers on your Android run without the cache. Even if your clear that stuff, from the next minute, the cache will start rebuilding again and the cycle will continue. So, clearing cache regularly isn’t a good idea to proceed. And you don’t have to follow a schedule on a daily basis since Android has a built-in mechanism for removing unwanted files.
However, most people clear cache every month or quarterly depending on their usage. Therefore, just do a periodical clean whenever you face performance issues.
Difference Between Clear Cache and Clear Data on Android
Clear cache and Clear data are two distinctive actions on Android. And the purpose of both is not the same. Let’s take a look at what they do.
Clear cache – It removes only temporary information stored such as pages/images/thumbnails/snippets loaded from the internet. And data like login information, media downloaded, browser history/bookmarks, files, and others will remain unchanged but you’ve to reload the pages again to get back everything.
Clear data – It performs two actions i.e Clear data button completely wipes out the cache stored and the total app data such as user settings, databases, login information, offline downloaded files, etc., and brings the app to its default state – just like the new one.
In simple words, Clear cache only removes cache but Clear data removes cache as well as resets the app to its default state.
Last Words
Cache is the main reason for keeping loaded pages active in the background. If you clear it, you’ve to load everything again from the internet from the very beginning. Of course, it also frees up a little bit of storage space but there is no need to brush up your Android every day. Just do a periodic clean either monthly or quarterly to flush out the junk and to boost your device performance temporarily. Why because, even if you clear cache every day, apps will build up cache again and start occupying the storage space. This process is cyclic and nothing stops it.
Hope you’re now very clear about cache, how to clear cache on Android and popular web browsers Chrome and Firefox, and how to automate cache clearing with the Avast Cleanup app.
If you’re that strapped for memory, we suggest you clear the cache manually every month instead of automating the process with the Avast Cleanup app premium.



6 Responses
[…] If the smartphone model you own from Samsung has a bulk amount of cache, know how to clear the app cache and data on your Samsung Galaxy phones from inside very easily without downloading any third-party […]
[…] if you need some help in clearing cache on the sub-brands of Xiaomi, finish reading this post to know how to clear cache in Redmi […]
[…] Suggested: How to Clear Cache on Android to Boost Speed and Free Up Storage Space […]
[…] Clearing cache on any model of Realme isn’t a tough process since the latest released updates realme UI 3.0 and 2.0 made the overall interface more straightforward and intuitive. […]
[…] the system won’t let you allow any new entries until you empty trash, which is nothing but cached data and unwanted files or […]
[…] update Google Play Store without opening it, Clear Cache and Data of the app and restart your phone. And when you’re back, Google Play Store will […]