How to Block Ads on Android – A Complete Guide?
Decided to remove ads on your Android phone? If you’re working on it, finish reading this post to disable ads on Android without rooting the device and installing third-party apps.
Today, digital screens are overwhelming with ads from every side in different types and are ruining the complete browsing experience. Also, chewing half of the mobile data and draining the battery.
Ads are useful and of course, they’re the source of income for developers and the owners of apps and websites we visit. But, there is no need to stick around every time they appear since some online ads are very intrusive and annoying to see. Especially when streaming movies/videos, reading news, browsing the web, etc.
In fact, some pop-up ads, fullscreen adverts, and video advertisements appear spontaneously and freeze the page on the spot and never go off so easily, which is quite frustrating.
Have you ever seen such ads? Well, these are the times that most people decide to block ads on Android. And I’m also the one who got frustrated with them. So I started looking for a reliable solution and at last prevented those intrusive ones targeting my Android.
I think it is time for me to share how do I block ads on Android apps after all. It’s with a built-in feature called DNS. Let’s get into the post and do everything as explained to disable ads in Android.
Contents
- What is DNS?
- How to Block Ads on Android with DNS
- Best DNS Hostnames
- How to Block Ads on Android Apps
- Why Block Ads on Chrome Android
- How to Block Ads in Google Chrome Android?
- How to Block Pop up Ads in Chrome Android?
- What is Lite Mode in Google Chrome?
- How to Enable Lite Mode in Google Chrome?
- Frequently Asked Questions
- Ending the Article
What is DNS?
A domain Name System or simply DNS is a naming database used to turn human-readable domains into machine-readable IP addresses. So that browsers get to the websites and other internet resources to load pages.
We all know that each and every device connected to the internet has its own IP address, which is used by other devices to find and communicate with one another by using a series of numbers. These numbers are known as IP addresses. When you want to go to a website, DNS servers make it possible to input just the domain name instead of entering those series of numbers.
How to Block Ads on Android with DNS
From the above definition, you’ve got an idea of what DNS is. For mobile devices, Private DNS was introduced with Android Pie and later versions, which is one of the best-hidden features to stay away from pesky Android ads.
When you use it and connect to an ad-blocking DNS server, it easily disable ads on Android and keeps everything clean.
Except for giving it a valid hostname, you probably need nothing to make this happen.
Therefore, to remove ads on Android? Have a quick look at these steps to know how to set up Private DNS to disable ads on phone without rooting your Android.
Step 1: Find the Private DNS setting
Private DNS setting for Android was introduced with Android 9. Therefore, if the Android version running on your device is 9 or later versions, open the Settings app and jump to ‘Connection & sharing’ to see the Private DNS option on your Android.
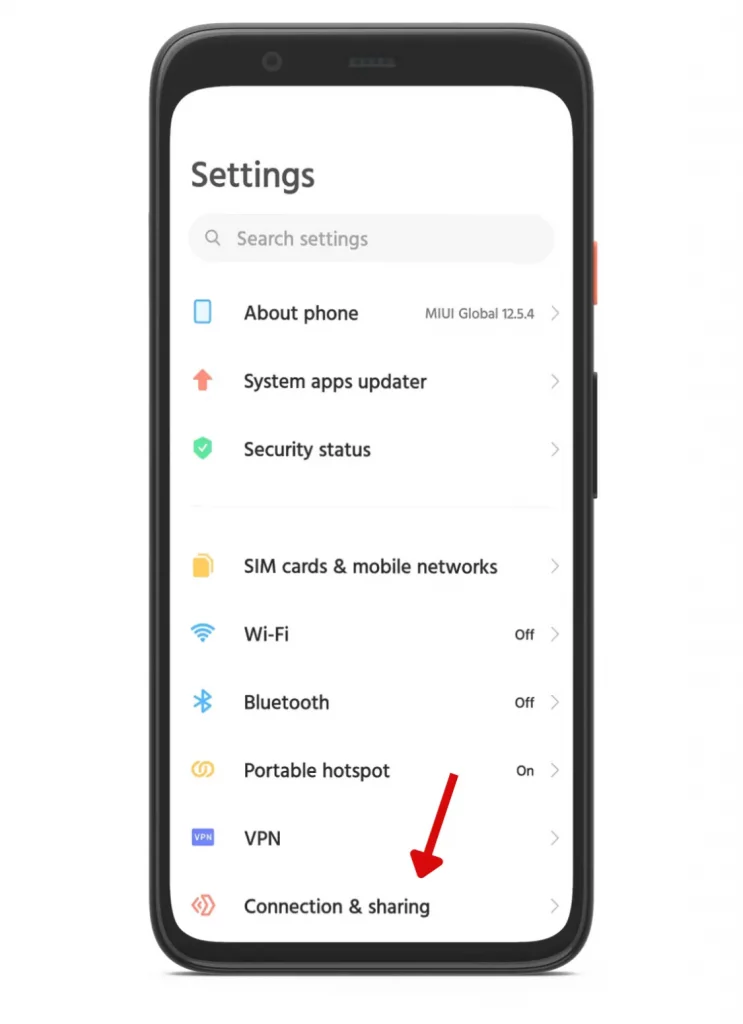
You can also use the Settings search bar to find the Private DNS option since the steps may vary based on your Android version or skin.
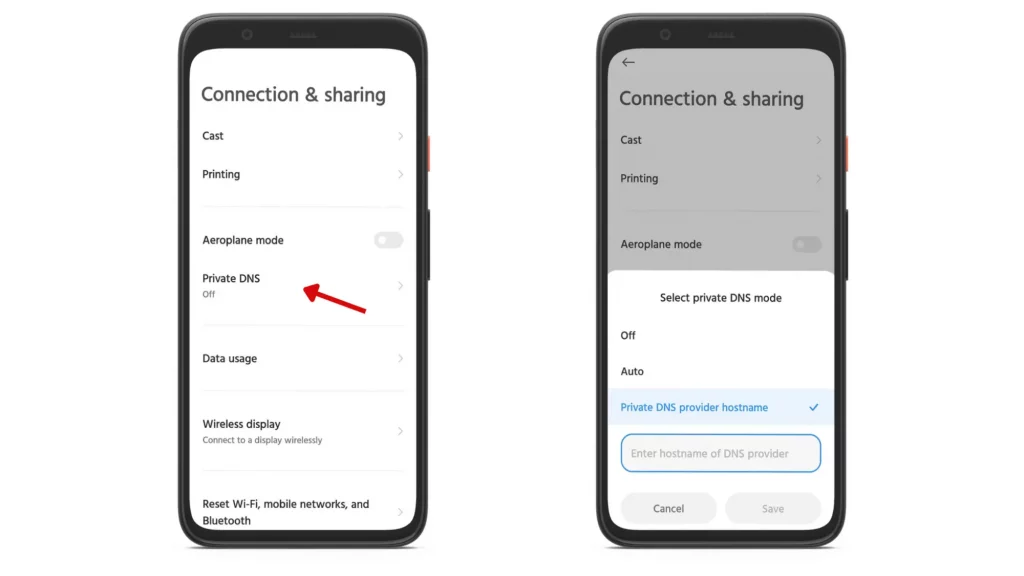
Step 2: Select Private DNS mode
After finding the Private DNS setting on your Android, tap on it and set Private DNS mode as Private DNS provider hostname (the third one) instead of Off and Auto.
Step 3: Give it a valid hostname
In the box, Enter hostname of DNS provider if you’ve any, or copy this ‘dns.adguard.com’ without the quotes and paste it. Finally, hit Save and back to the home screen.
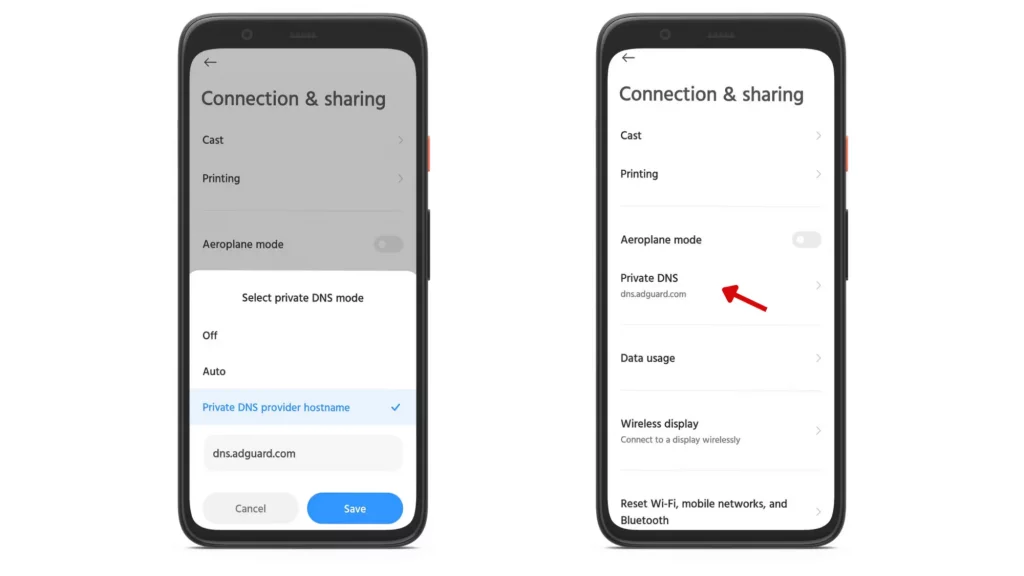
You’re done. To make this setting work, simply restart your device. So that your phone starts using AdGuard’s DNS server and blocks all the ads targeting your device.
Best DNS Hostnames
- dns.google
- dns-family.adguard.com
- 1dot1dot1dot1.cloudflare-dns.com
- security.cloudflare-dns.com
- family.cloudflare-dns.com
- dns.nextdns.io
- max.rethinkdns.com
This trick blocks almost 95% of the ads from apps and websites. But, it won’t disable ads on premium-based services like YouTube, Spotify, etc.
Wait, what about the rest of the 5% of ads? If you’d like to stay away from the annoying ads completely, finish reading the rest of the post to get to know how to block ads on Android apps to make everything clean and attractive.
Suggested: How to Clear Cache on Android to Boost Speed and Free Up Storage Space
How to Block Ads on Android Apps
Everyone has their unique choices in installing apps and games. But, there are some apps that everyone uses all the days in a year to surf the web, reading news, watching videos, listening to music, etc.
All these kinds of primary apps mostly come by default on every Android device. Of course, based on the brand, the titles may vary accordingly. But, one of the evergreen apps that come by default on every handset is Google Chrome, the most powerful and heavily used web browser.
So, let’s start with it first and then proceed to check how to block ads on Android apps to stay away from ads completely.
Why Block Ads on Chrome Android
Ads are the main reason that many services provide free access to users. Without advertisements, nothing on the internet comes for free and today you probably won’t visit this page to get rid of ads.
So, why block ads on Chrome Android? Google Chrome is the most used web browser of all, which means that there are high chances of getting trapped to malware attacks through ads. Therefore, for secure and fast browsing, it is better to say no to ads on Chrome Android.
How to Block Ads in Google Chrome Android?
To block ads on Chrome Android, you don’t need a VPN service/DNS hostname or something external, since all the latest versions of Chrome have an inbuilt feature that block ads on websites Chrome. So, if you want to remove ads on websites Chrome, simply do as explained below.
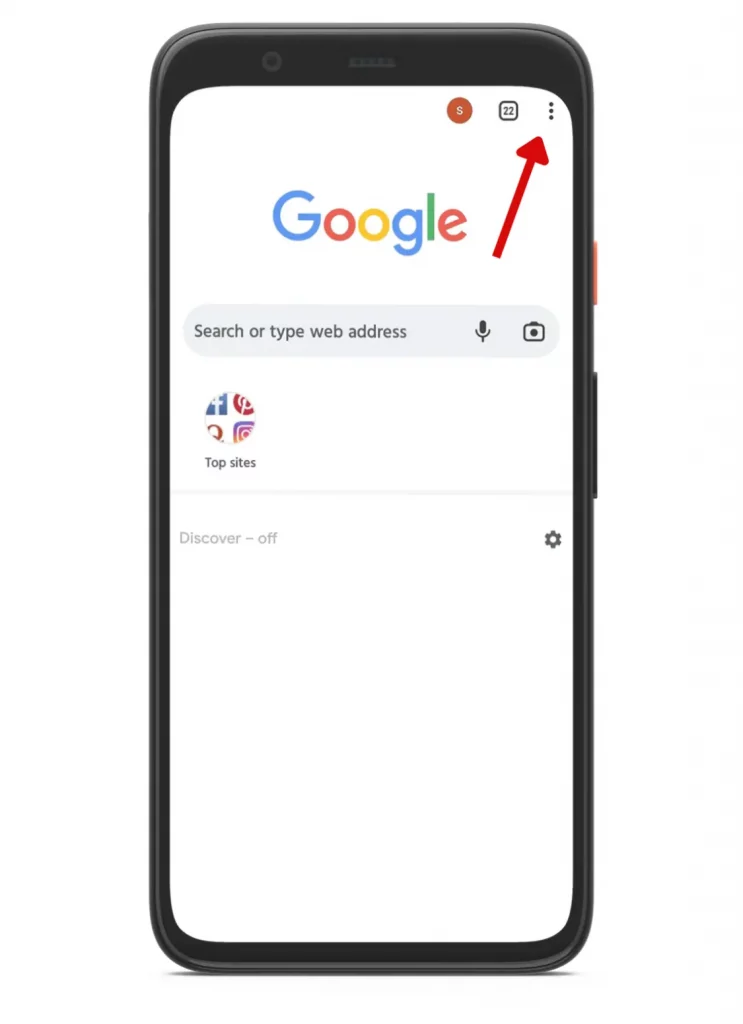
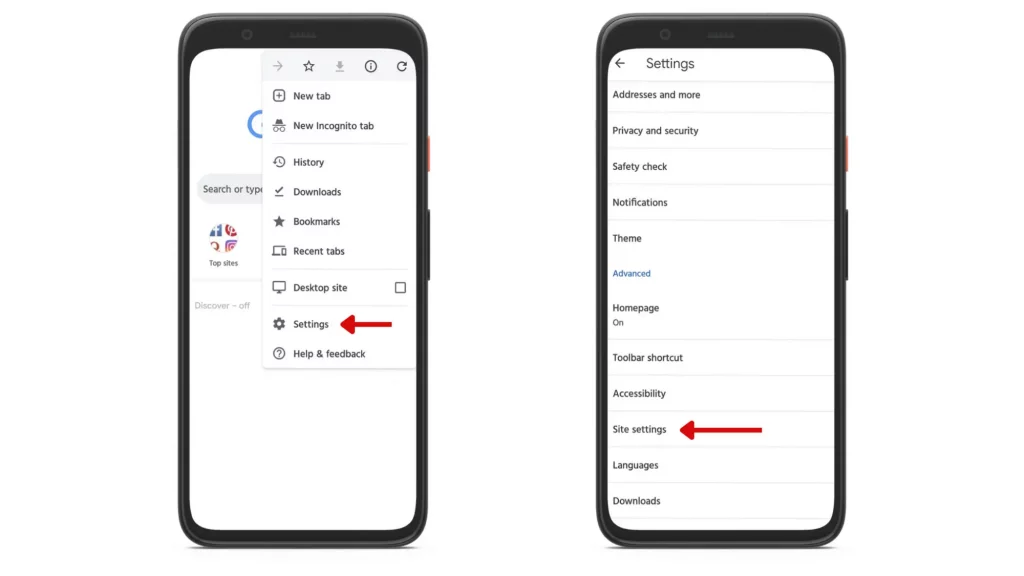
1. To begin with, launch Chrome Browser and tap on the ellipsis/three-dot menu button in the top right corner to view the drop-down menu.
2. From the drop-down menu, move to Settings > Site settings > ads.
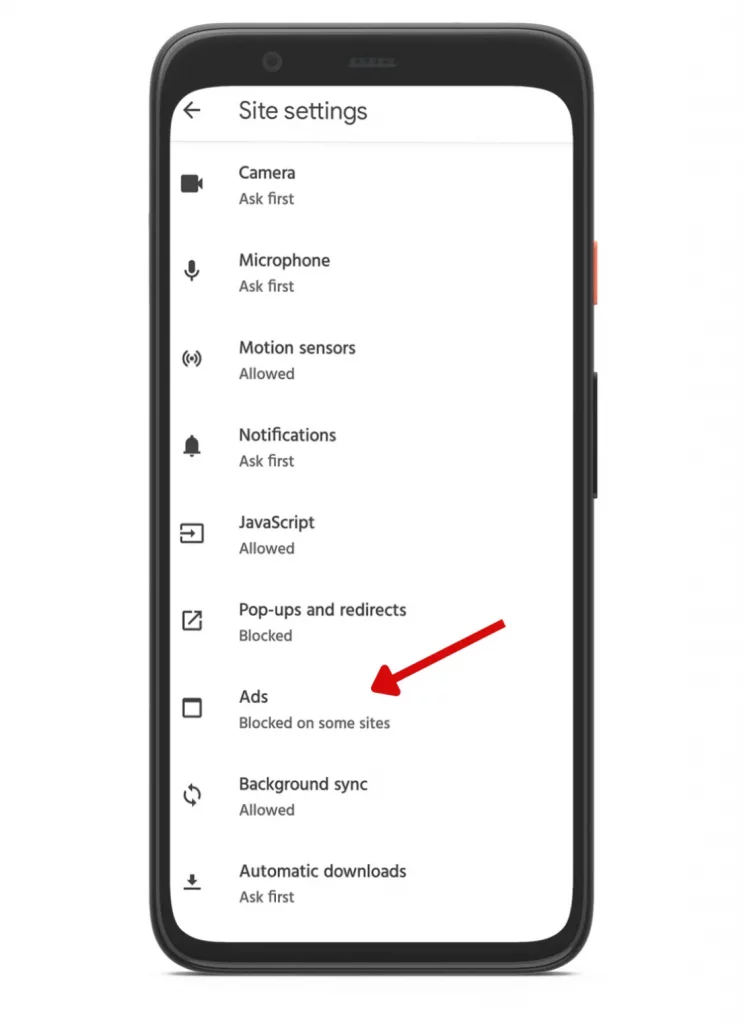
3. There you’ll see the option “Block ads on sites that show intrusive or misleading ads’ with a toggle switch. To remove ads on Chrome browser, simply, turn it off.
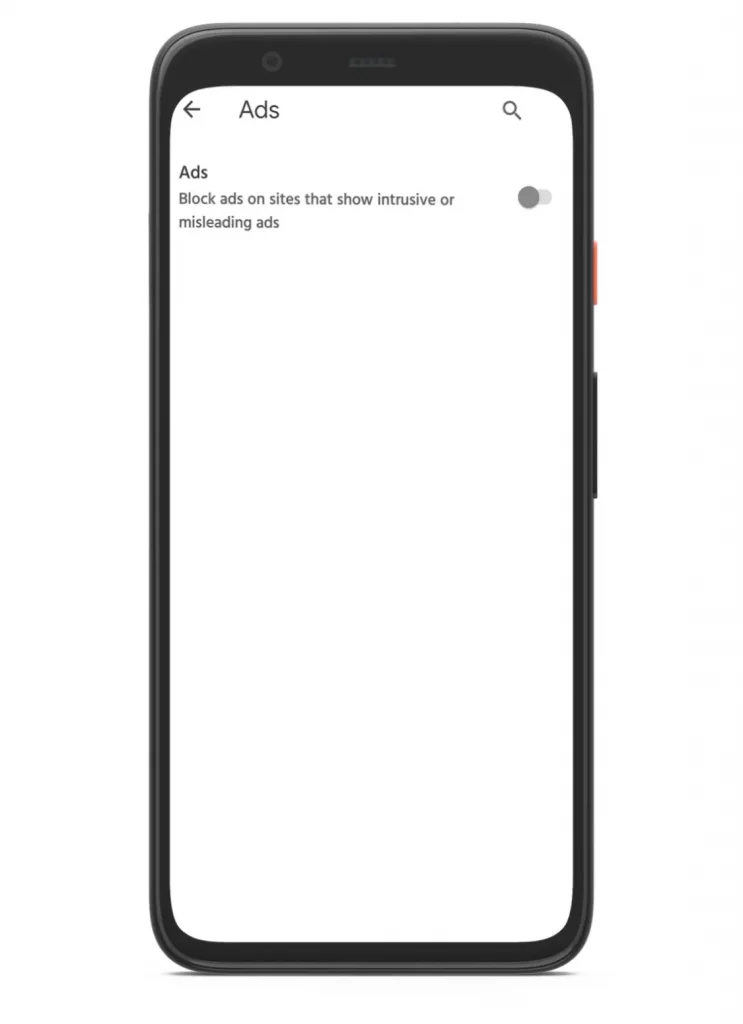
That’s it. Relaunch the browser and start browsing without any disturbances.
Wait, you think you’re done. No, there’s one more thing left to completely stay away from ads i.e pop-ups and redirects. To know how to block pop up ads in Chrome Android, just follow the below instructions.
How to Block Pop up Ads in Chrome Android?
There is no use in allowing pop-up ads to target the device. Because most of the pop-up ads open up in new tabs and completely mislead the way you browse the web by redirecting to some kind of junky external website. And stepping back from there is a bit challenging since the majority of them disconnect from the web and freeze the page.
To fall back, the best way is to close the entire tab/tab group. It means you’ve to step out of the page/pages sometimes, which is quite frustrating. Therefore, to get rid of pop-ups and redirects, the steps below will guide you to disable popup ads Chrome.
1. First, open your Chrome web browser and tap on the ellipsis/three-dot menu button in the top right corner to view the drop-down menu.
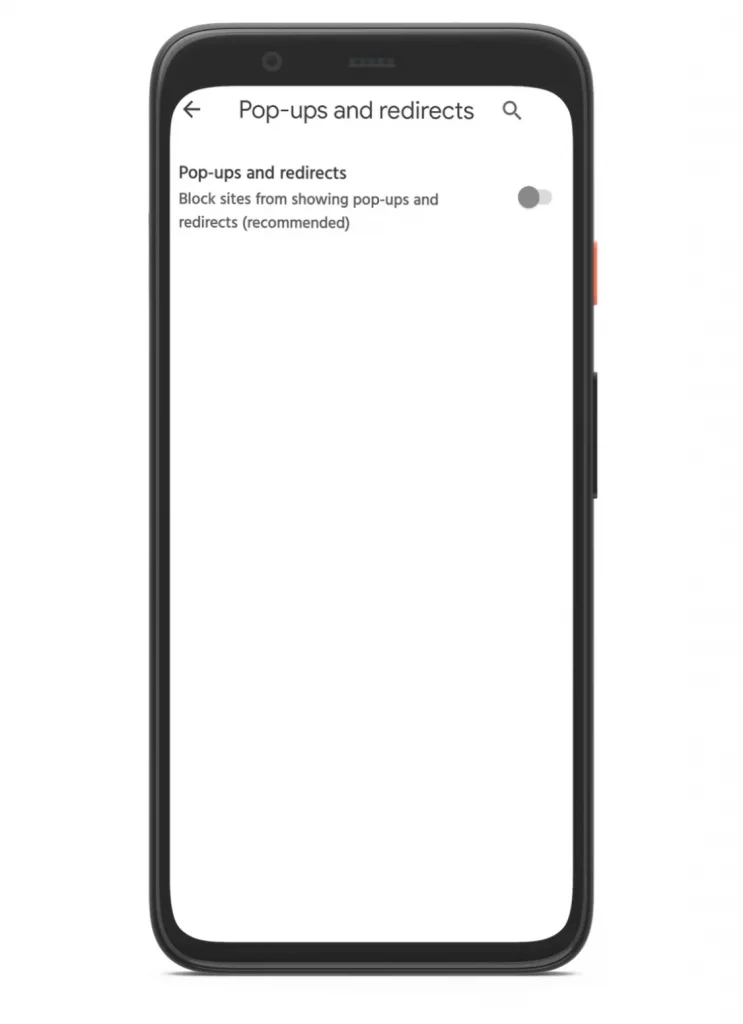
2. From there, move to Settings > Site settings > Pop-ups and redirects.
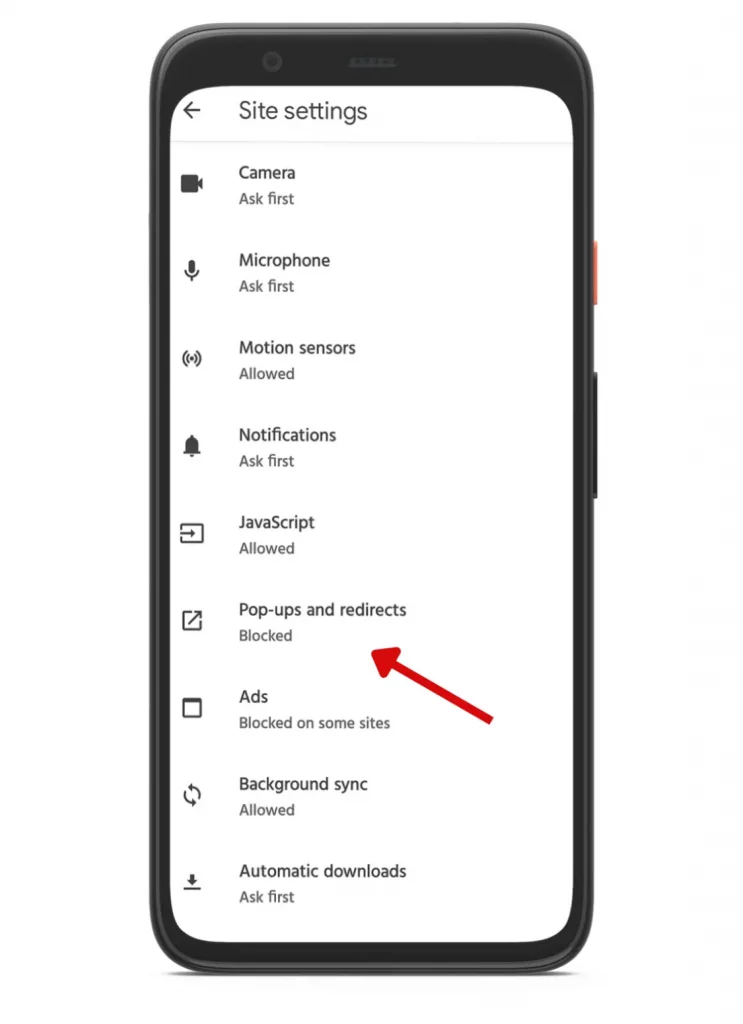
3. There you’ll see the option ‘Block sites from showing pop-ups and redirects’ with a toggle switch. To disable popup ads Chrome, toggle the switch to off state if turned on (otherwise don’t make any changes).
There you go. You’ve successfully set your Chrome browser to stop ads/pop-ups and redirects from disturbing the workflow. Relaunch your Chrome browser once and check if you still see the annoying pop-up ads on the websites.
PS – Along with these changes, if you want to make web pages load faster with less data consumption, enable Lite Mode in Chrome. Let’s see how to activate Chrome Lite Mode to fasten the web page’s loading time.
What is Lite Mode in Google Chrome?
Lite Mode in Chrome is an advanced ‘Data Saver’ that uses Google servers to speed up page loading speed without eating much data. When you turn it on, pages that are heavy and slow to load are identified and sent through Google servers to simplify.
How to Enable Lite Mode in Google Chrome?
To get rid of malicious ads as well as to make web pages load faster, Chrome’s Lite Mode is one of the best ways to stay on the safer side. If you want to give it a try, follow these steps.
1. Open the Chrome browser and tap on the three-dot menu button in the top right corner for options.
2. Select Settings and scroll the page.
3. Under Advanced, find Lite Mode and switch it.
Google removed Lite Mode with the release of Chrome 100 on 29 March 2022. In case, if your browser is running an older version, check if it is present and try using it.
Frequently Asked Questions
-
Can DNS block ads?
Yes, when you use it and connect to an ad-blocking DNS server, it easily disable ads on Android and keeps everything clean.
-
How do I block all ads on chrome?
To block all ads on Google Chrome, all you have to do is to turn off the options Ads/Ads and redirects by visiting Chrome Settings. For a detailed guide, follow the instructions given.
-
What is the best ad blocker for Chrome?
AdLock and AdGuard are the best ad blockers for removing pop-ups and other ads on all major browsers.
-
How do I stop pop up ads on Android Chrome?
To stop pop up ads in Chrome, tap on the three dots and go to Settings. Select Site settings and then move to Ads and redirects. To remove pop up ads Chrome, turn off the toggle switch.
-
How to turn off private DNS?
Open your phone’s Settings app and dive to Connection & sharing. Select Private DNS and set the ‘private DNS mode’ as Off and hit Save.
-
Can I remove ads from other apps?
Yes, apps like File Managers, Music, Video, Themes, and so on allow you to change some ad settings within the app. If you’re a Mi user, remove ads from apps by turning off Recommendations.
Ending the Article
How far do you see ads and close them every time by tapping the wrong mark? It’s really frustrating. Ads are useful but it is not mandatory to allow them everywhere and give permission to drain the battery and trouble the workflow.
With the above-mentioned instructions on how to block ads on Android with DNS and how to remove chrome ads, stay away from all those hassles and try to keep your Android always clean.


4 Responses
[…] Suggested: How to Block Ads on Android – A Complete Guide […]
[…] Suggested: How to Block Ads on Android – A Complete Guide? […]
[…] Also Read: How to Block Ads on Android – A Complete Guide? […]
[…] Suggested Read: How to Block Ads on Android – A Complete Guide? […]